# Tutorial
Let's build a very simple app using Vuex to understand how to use it. For this example, we're building an app where you press a button, and it increments a counter.

We are using this simple example to explain the concepts, and the problems Vuex aims to solve - how to manage a large app which uses several components. Consider if this example used three components:
### `components/App.vue`
The root component, which contains two other child components:
* `Display` to display the current counter value.
* `Increment` which is a button to increment the current value.
```html
```
### `components/Display.vue`
```html
Count is 0
```
### `components/Increment.vue`
```html
```
### Challenges without Vuex
* `Increment` and `Display` aren't aware of each other, and cannot pass messages to each other.
* `App` will have to use events and broadcasts to coordinate the two components.
* Since `App` is coordinating between the two components, they are not re-usable and tightly coupled. Re-structuring the app might break it.
### Vuex "flow"
These are the steps that take place in order:
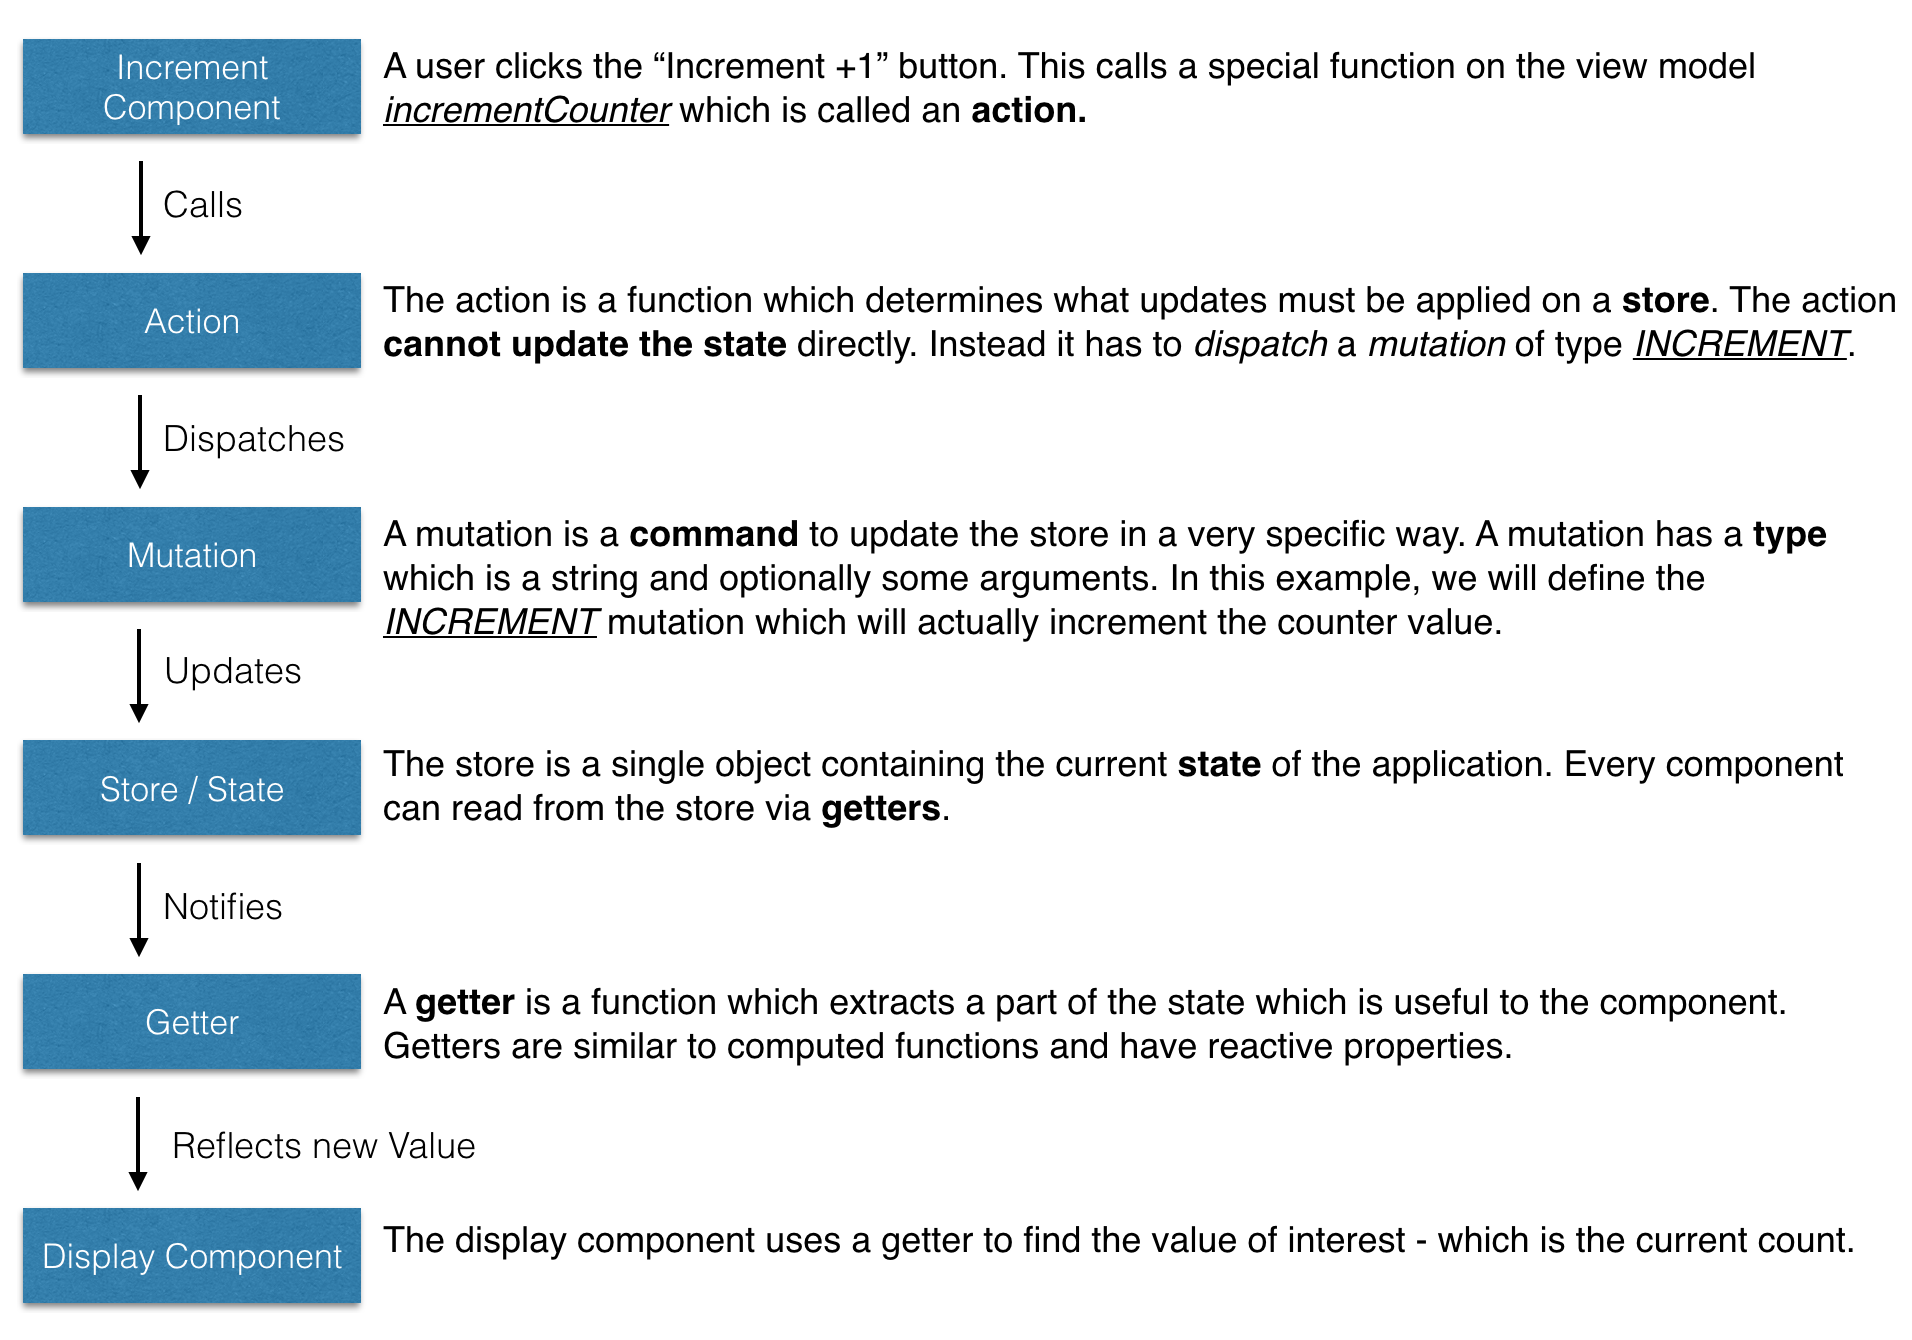
This might seem a little excessive for incrementing a counter. But do note that these concepts work well in larger applications, improving maintainability and making your app easier to debug and improve in the long run. So let's modify our code to use Vuex.
### Step 1: Add a store
The store holds the data for the app. All components read the data from the store. Before we begin, install Vuex via npm:
```
$ npm install --save vuex
```
Create a new file in `vuex/store.js`
```js
import Vue from 'vue'
import Vuex from 'vuex'
// Make vue aware of Vuex
Vue.use(Vuex)
// Create an object to hold the initial state when
// the app starts up
const state = {
// TODO: Set up our initial state
}
// Create an object storing various mutations. We will write the mutation
const mutations = {
// TODO: set up our mutations
}
// Combine the initial state and the mutations to create a Vuex store.
// This store can be linked to our app.
export default new Vuex.Store({
state,
mutations
})
```
We need to make our app aware of this store. To do this we simply need to modify our root component.
Edit `components/App.vue` and add the store.
```js
import Display from './Display.vue'
import Increment from './Increment.vue'
import store from '../vuex/store' // import the store we just created
export default {
components: {
Display: Display,
Increment: Increment
},
store: store // make this and all child components aware of the new store
}
```
> **Tip**: With ES6 and babel you can write it as
>
> components: {
> Display,
> Increment,
> },
> store
### Step 2: Set up the action
The action is a function which is called from the component. Action functions can trigger updates in the store by dispatching the right mutation. An action can also talk to HTTP backends and read other data from the store before dispatching updates.
Create a new file in `vuex/actions.js` with a single function `incrementCounter`.
```js
// An action will receive the store as the first argument.
// Since we are only interested in the dispatch (and optionally the state)
// we can pull those two parameters using the ES6 destructuring feature
export const incrementCounter = function ({ dispatch, state }) {
dispatch('INCREMENT', 1)
}
```
And let's call the action from our `components/Increment.vue` component.
```html
```
Notice some interesting things about what we just added.
1. We have a new object `vuex.actions` which includes the new action.
2. We didn't specify which store, object, state, etc. Vuex wires everything up for us.
3. We can call the action by using `this.increment()` in any method.
4. We can also call the action using the `@click` parameter making `increment` like any regular Vue component method.
5. The action is called `incrementCounter` but we can use any name which is appropriate.
### Step 3: Set up the state and mutation
In our `vuex/actions.js` file we dispatch an `INCREMENT` mutation but we haven't written how to handle it yet. Let's do that now.
Edit `vuex/store.js`
```js
const state = {
// When the app starts, count is set to 0
count: 0
}
const mutations = {
// A mutation receives the current state as the first argument
// You can make any modifications you want inside this function
INCREMENT (state, amount) {
state.count = state.count + amount
}
}
```
### Step 4: Get the value into the component
Create a new file called `vuex/getters.js`
```js
// This getter is a function which just returns the count
// With ES6 you can also write it as:
// export const getCount = state => state.count
export function getCount (state) {
return state.count
}
```
This function returns a part of the state object which is of interest - the current count. We can now use this getter inside the component.
Edit `components/Display.vue`
```html
Count is {{ counterValue }}
```
There's a new object `vuex.getters` which requests `counterValue` to be bound to the getter `getCount`. We've chosen different names to demonstrate that you can use the names that make sense in the context of your component, not necessarily the getter name itself.
You might be wondering - why did we choose to use a getter instead of directly accessing the value from the state. This concept is more of a best practice, and is more applicable to a larger app, which presents several distinct advantages:
1. We may want to define getters with computed values (think totals, averages, etc.).
2. Many components in a larger app can use the same getter function.
3. If the value is moved from say `store.count` to `store.counter.value` you'd have to update one getter instead of dozens of components.
These are a few of the benefits of using getters.
### Step 5: Next steps
If you run the application, now you will find it behaves as expected.
To further your understanding of Vuex, you can try implementing the following changes to the app, as an exercise.
* Add a decrement button.
* Install [VueJS Devtools](https://chrome.google.com/webstore/detail/vuejs-devtools/nhdogjmejiglipccpnnnanhbledajbpd?hl=en) and play with the Vuex tools and observe the mutations being applied.
* Add a text input in another component called `IncrementAmount` and enter the amount to increment by. This can be a bit tricky since forms in Vuex work slightly differently. Read the [Form Handling](forms.md) section for more details.